
The Heatwave Blanket

It would be fair to say that I get excited every time I post a new pattern. But this time I am especially excited because this one is VERY different! Now, you may be wondering what is so different about a plain old granny stripe pattern? This difference is not the what, it’s the how.
Here’s the exciting bit… I didn’t write this pattern. It was generated using one of the tools in the App that I designed with my son Matt . It’s called Crochet Studio and is available for iPhone and Android .
It’s very simple to use, and with just a few taps, anyone can make a printable pdf pattern. This prototype makes Granny stripe patterns, but the technology works equally well for all patterns, including granny squares.
How does it work?
First of all, choose the yarn colours you want to use. You can filter by brand, yarn type etc. I’m using Scheepjes Colour Crafter here. Just tap the ones you want to use and they will be automatically saved to a palette. Alternatively, you can choose from hundreds of ready-made palettes.

Tap Stripe Generator and select your chosen palette.
Now add the size you want your blanket to be. Use the sliders, type in the boxes or choose from a list of preset sizes. You can also choose UK or US term and Metric or Imperial measurements in the settings.

Now tap randomise. There are all sorts of variables you can change if you want to. Then tap ‘Make some magic"‘ and the app will make you a random stripe pattern.
If you prefer, you can drag and drop colours to exactly where you want them to be. This is how I made the Heatwave Blanket pattern.
That’s it! Tap ‘Generate pattern’ and Crochet Studio will make you a pdf pattern that you can save, share or print.

The pattern will tell you the exact amount of yarn you need in each colour, so no more yarn chicken!
It will also calculate the starting chain for you and give you a numbered list of every stripe.
It’s so simple to use and great fun! You can download the Heatwave blanket pattern by clicking the button below. This is the actual pdf, generated by Crochet Studio.
Ok, let’s get on with the blanket.
Click below to download the pattern.
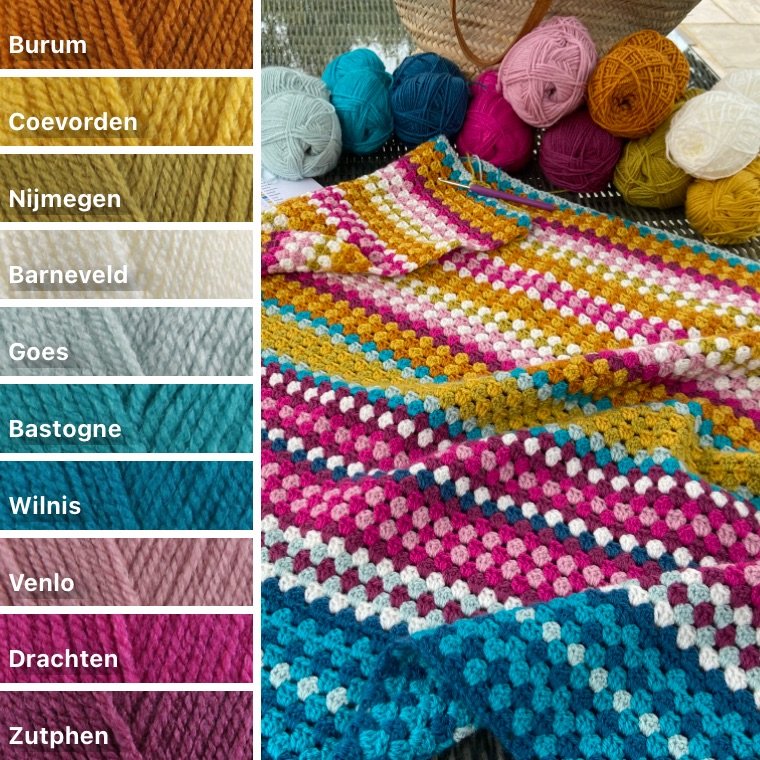
The pattern will tell you the exact amount of each colour required in grams so you can check your stash. I have used Scheepjes Colour Crafter DK.
Finishing off
I’ve added a border and tassels to my blanket. This is optional as Granny stripe has nice straight edges without one.
As the blanket is so full of colour, I’ve kept the border very simple. I’ve stated the colours I used, but you can use whichever ones you choose. Like the pattern, these are UK terms.
Round 1: Join Wilnis in any stitch on a short side. 1dc (US sc) in each stitch until you reach a corner. 1dc, 2ch, 1dc in same stitch to form corner. 2dc at the end of every treble row. (You can see this in the picture. Click to enlarge if you need to). 1dc, 2ch, 1dc in same stitch to turn the corner. Work around in the same manner and ss to join your first dc.
Round 2: Join Goes in any dc. 1dc in each stitch, 1dc, 2ch,1dc in each corner 2ch space.
Round 3: Repeat round 2 in Wilnis.
Round 4: Repeat round 2 in Bastogne.
Round 5: Repeat round 2 in Wilnis.
Round 6: Turn over so the WRONG side is facing you. Join Goes in any dc and 2ch. (2 counts as first tr/ US dc). Ss in the next st then tr in the following stitch. Alternate between ss and tr all the way around. When you reach a corner, make one of each stitch in the corner space. It doesn’t matter which order these stiches occur in, just continue in your alternating pattern. At the end of the round, join to the first ch 2 with a ss. Cut yarn, pull through loop to finish and sew in tail.

The finishing touch is the tassels. Hooked By Robin has a fab video tutorial which explains how to make and attach them. You can find it here.
I hope you enjoy making this blanket. I’ve really loved every minute of these bright, zingy colours, even if crocheting a blanket is not the best thing to be doing in 39 degree heat. It really is a heatwave blanket!😁
