
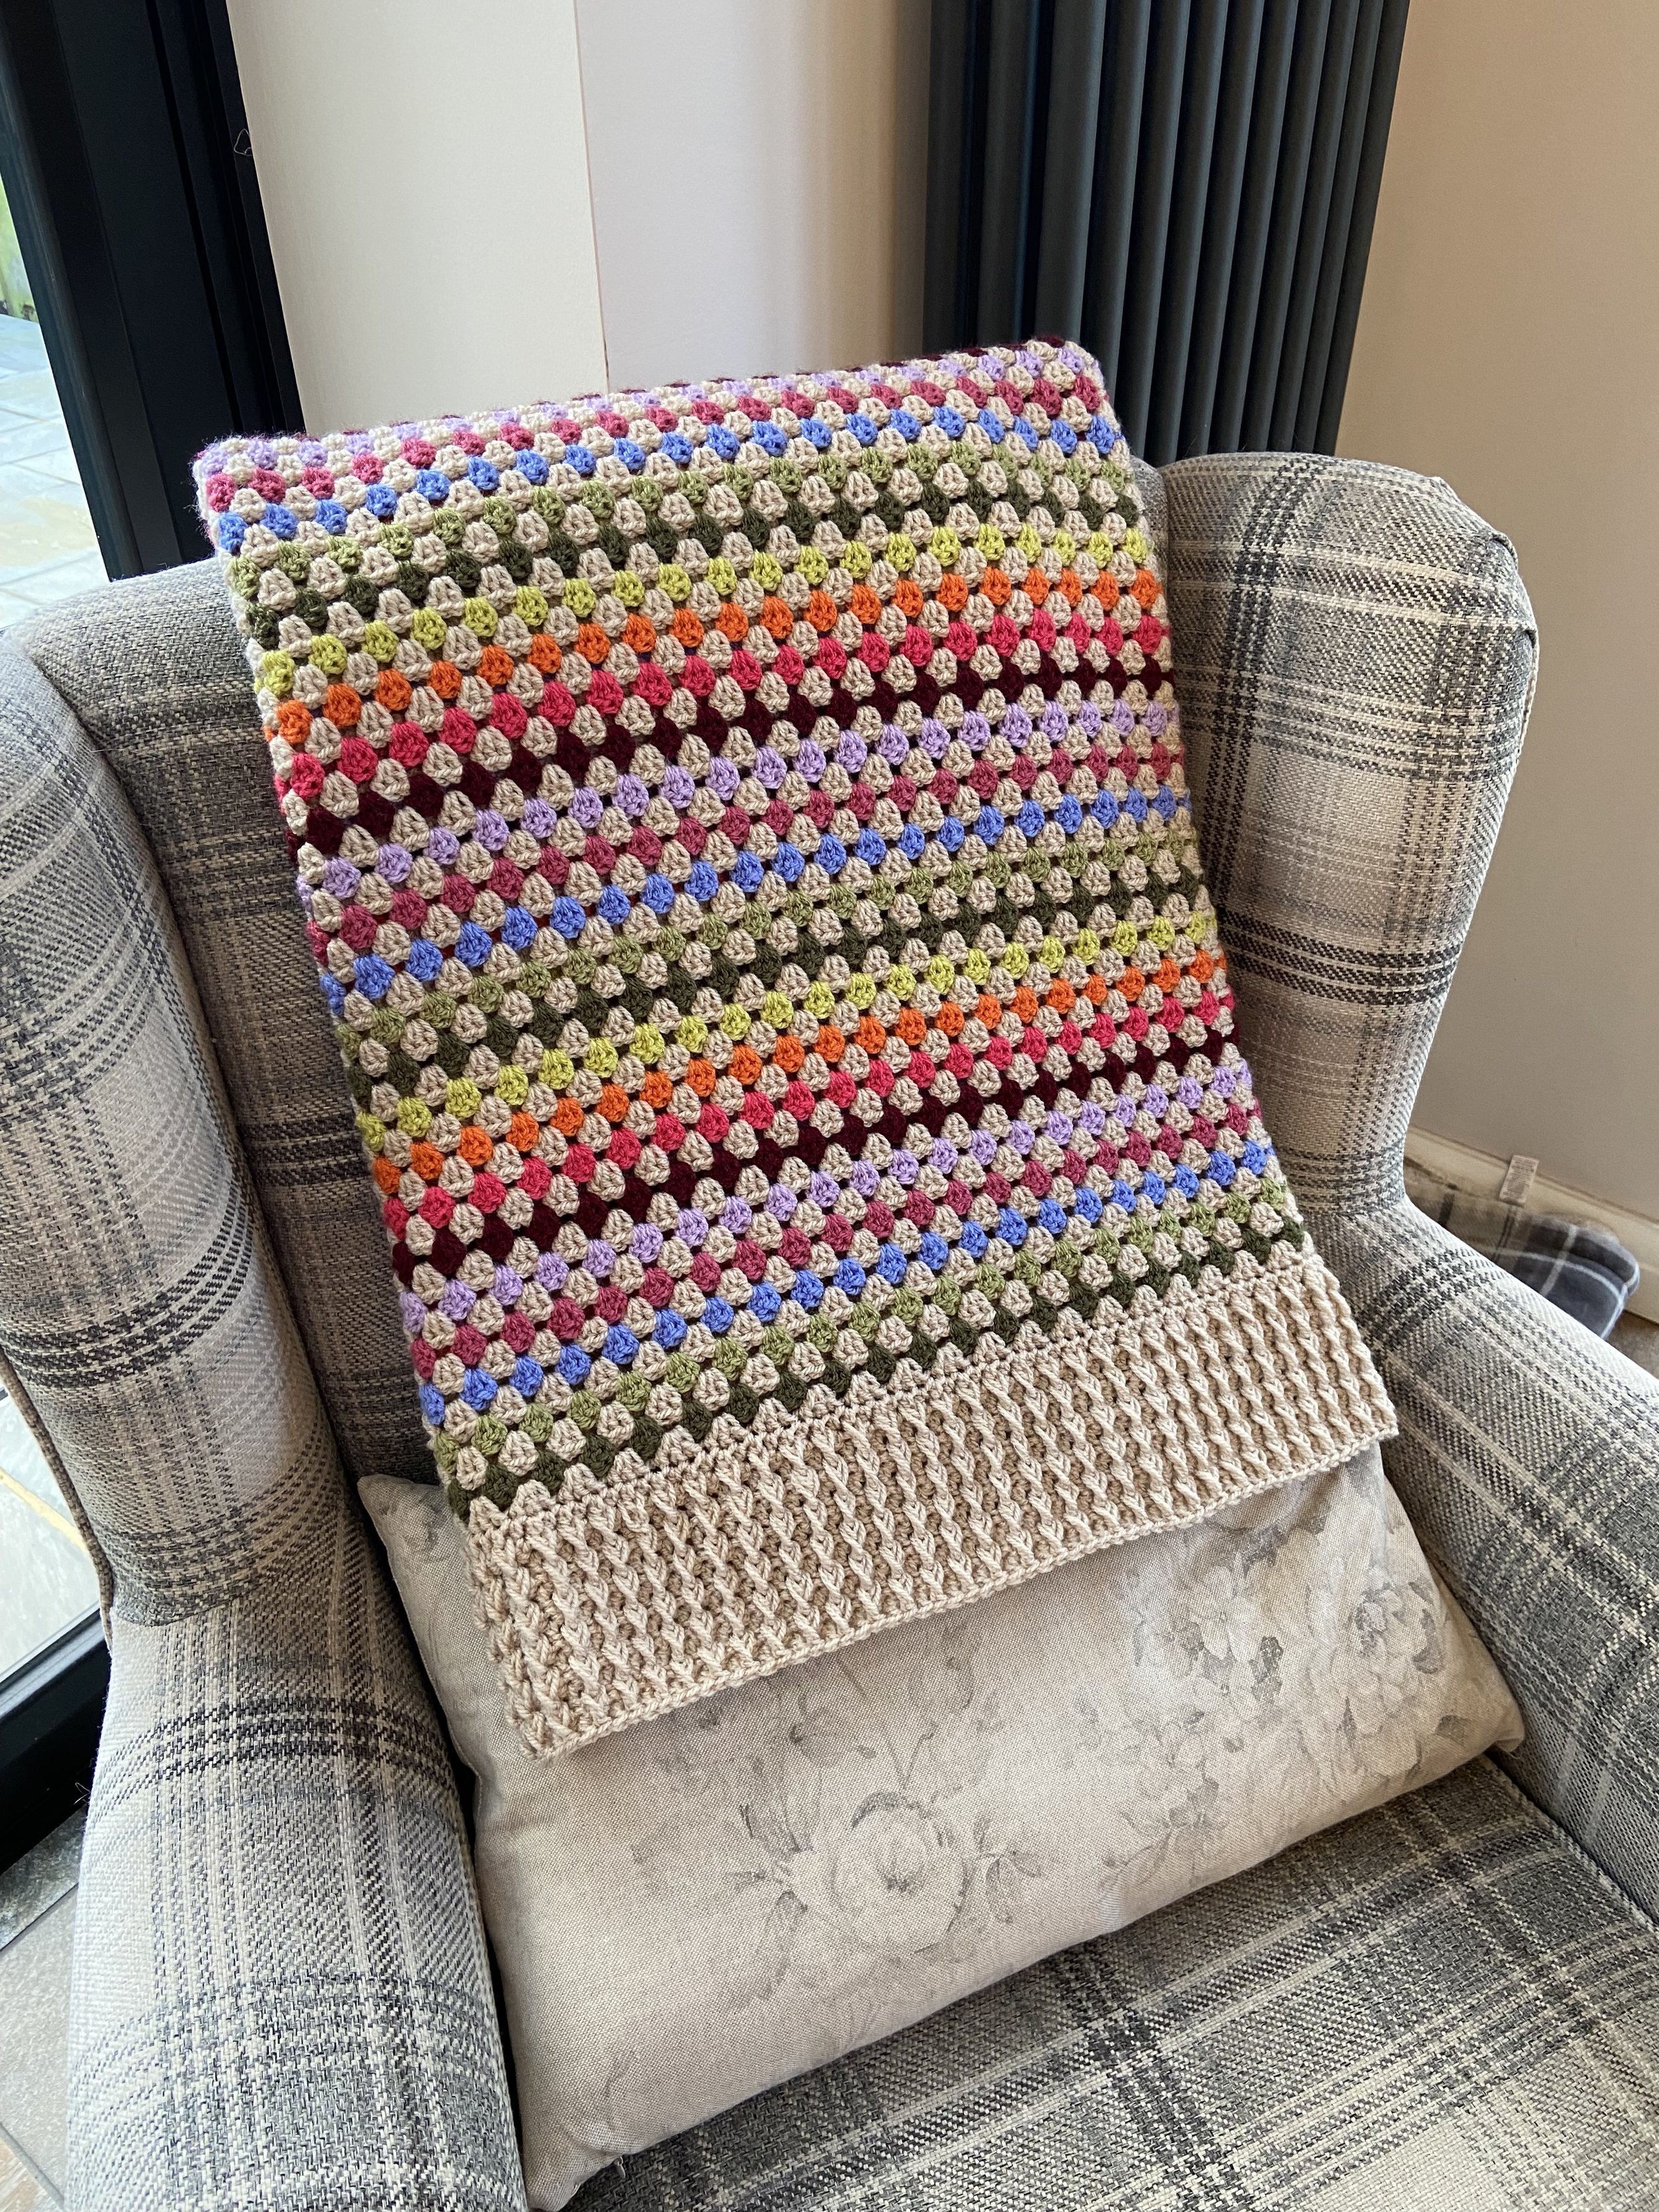
My Favourite Stripes Blanket
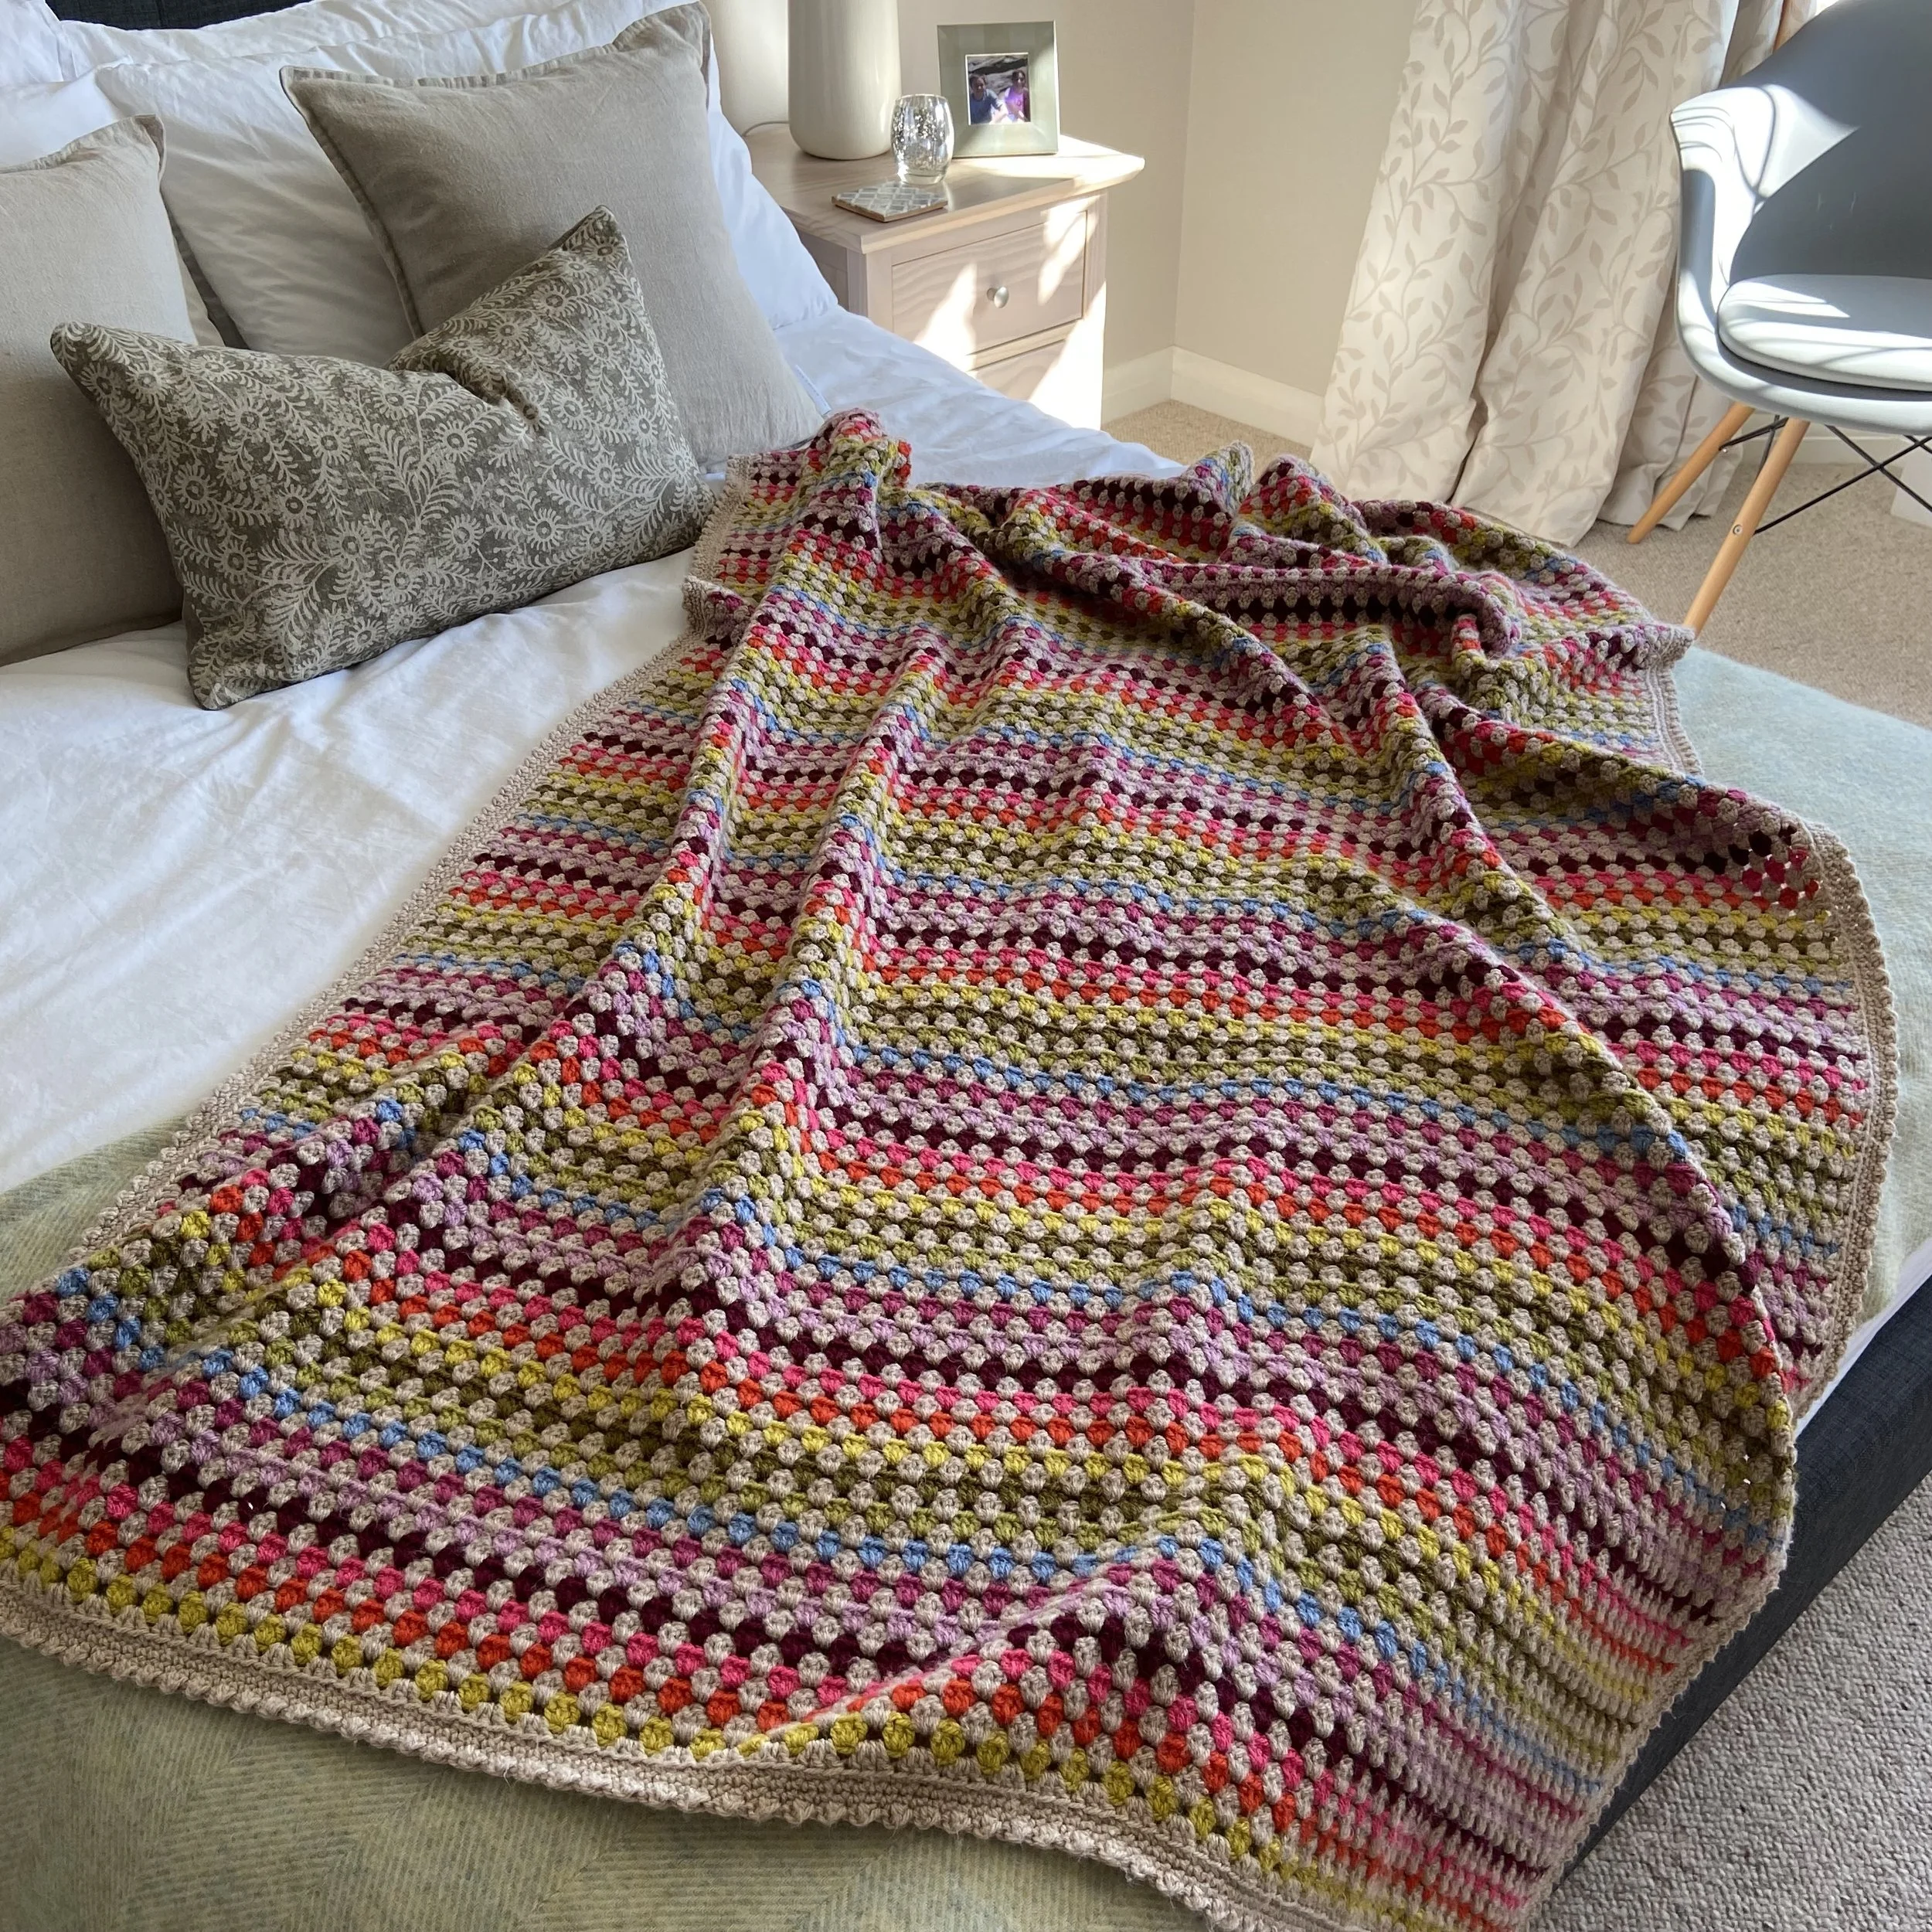
I first made this design in 2014 and, over the years, it has become the blanket I reach for time and time again. In fact, it's the only crochet blanket I regularly use in my own home!
One of the things I love most about the granny stripe is its simplicity. Once you've established the pattern, the stitches soon settle into a gentle rhythm, making it the perfect project for relaxing at the end of the day. This version features a repeating colour sequence, so there's no need to keep deciding what comes next.
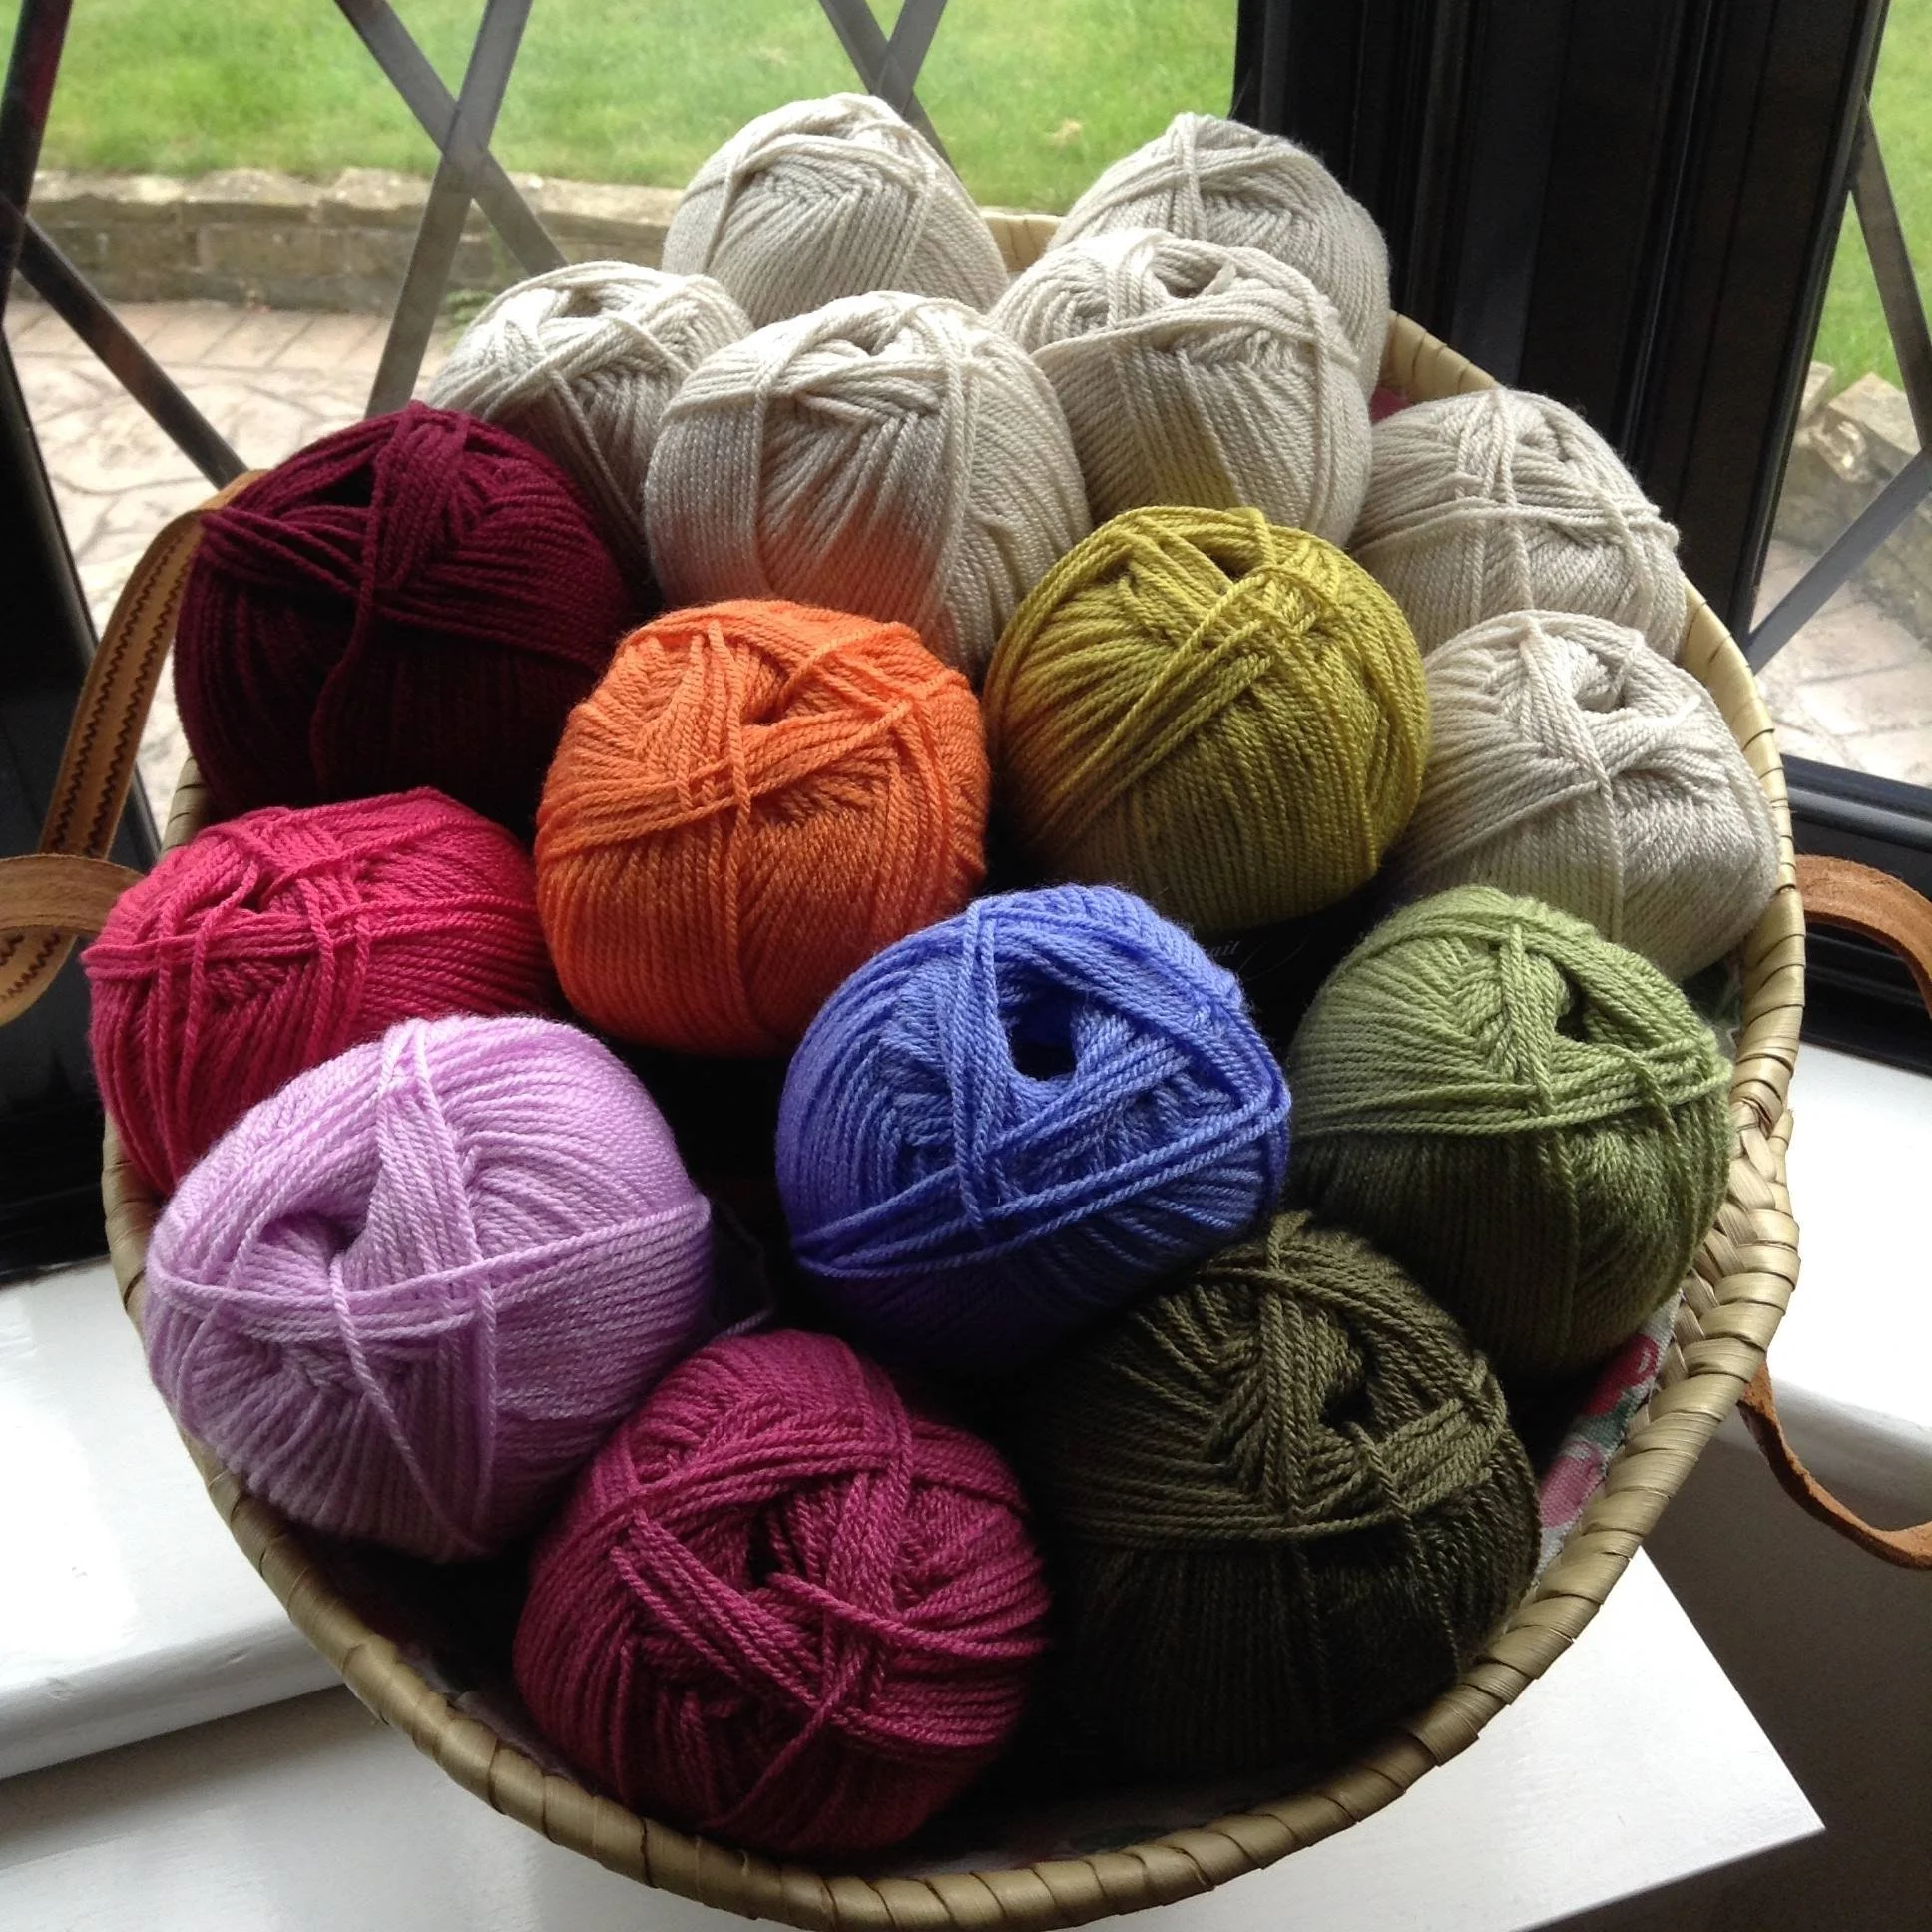
You can buy a kit to make this blanket here.
There’s also an advert free pdf with the complete pattern and tutorial.
Tools
4mm (US G/6) hook
5mm (US H/8) hook for ribbed border (optional)
Yarn needle
Scissors
Gauge
15tr x 10 rows = 10cm (4")
Gauge is not vital for this blanket as long as your tension is consistent throughout.
Notes
The blanket is worked back and forth in rows. Always start a new row where the previous row ended. Turn the blanket after every row unless the pattern specifies otherwise.
Measurements
Finished size with ribbed border 120 x 185cm (47¼ x 73 inches)
Finished size with bobble border 125 x 175cm (49¼ x 69 inches)
The tutorial will show you how to make your blanket any size you like.
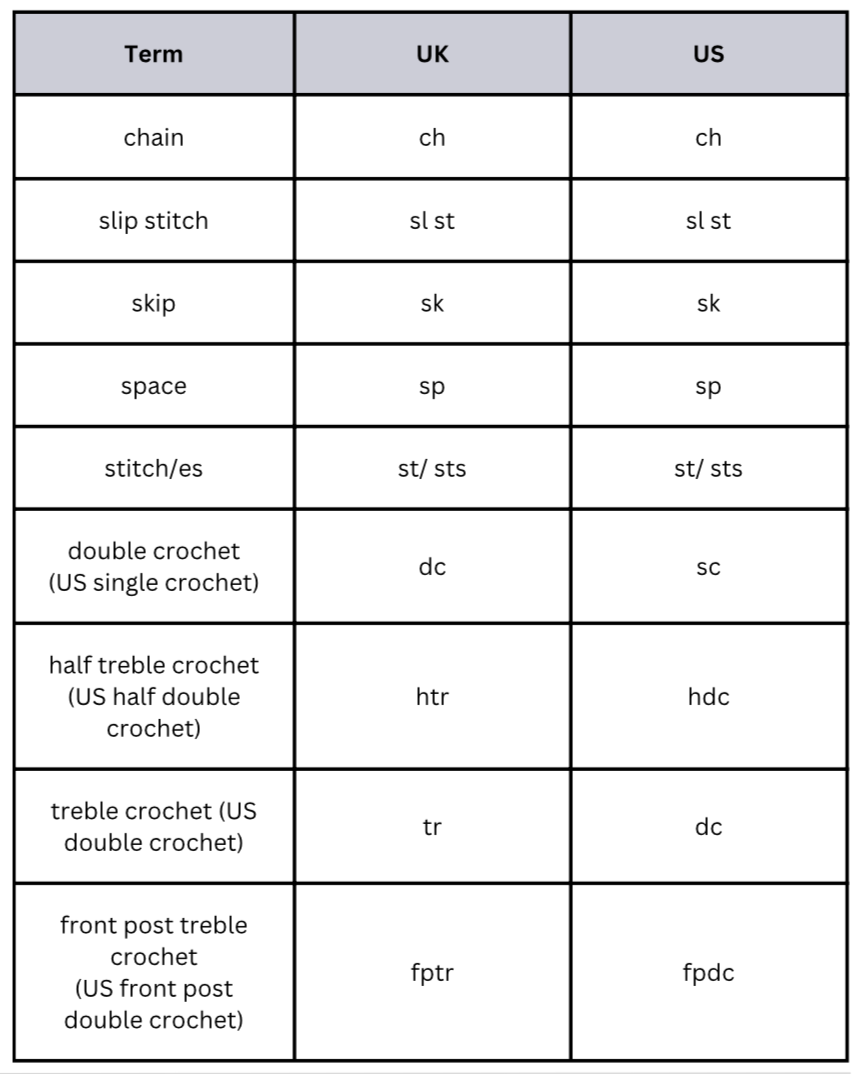
This pattern is written in UK terms with US conversions given in the chart below.
Granny Stripe Tutorial
You can use this tutorial to make a granny stripe blanket in any size you like. Your starting chain should always be divisible by 3. You then need to add an extra 3 chains which count as your first treble crochet.
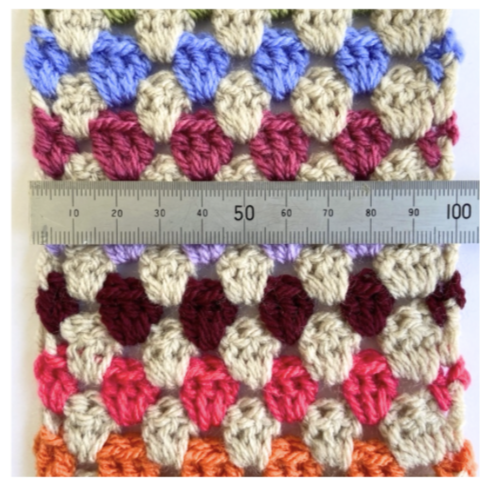
As a guide, a starting chain of 15+3, using DK yarn and a 4mm hook will make a 10cm wide granny stripe.
You can use this to work out the starting chain for any size piece.
i.e. for a finished width of 140cm
140cm divided by 10cm = 14
14 x 15 chains = 210 chains
So, your starting chain will be 210+3
Your tension may be different to mine, so if size is important, it would be a good idea to make yourself a swatch by chaining 15+3 and working a few rows so you can measure. Go up or down a hook size to obtain the correct gauge if you need to.
Sewing in the tails
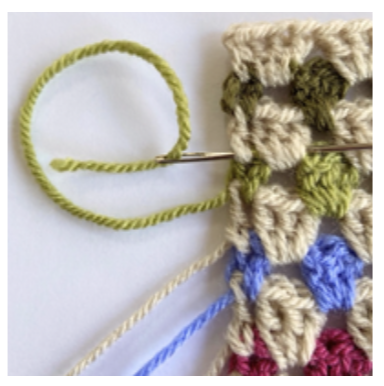
This type of granny stripe creates a lot of ends to sew in. I like to get them done as I go along and sew in after every few rows.
Use a yarn needle to sew the tail through the top of the row. Make sure the needle catches a couple of fibres of the yarn to anchor it, then thread back the other way. Snip off the excess. Always sew the tail into its own row so it becomes invisible. Don’t pull too tightly or you will distort the edges.
This method of making granny stripe gives nice straight edges that it can be left without a border if you don’t want to add one.
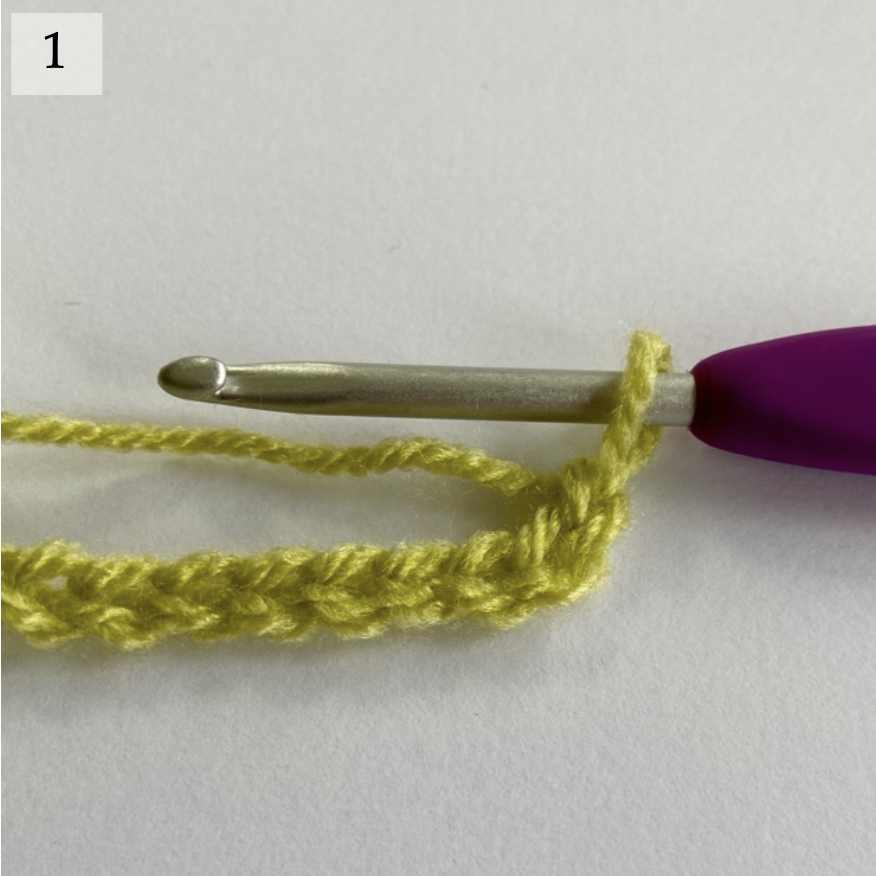
1. Chain the required number of stitches. Chain loosely. If the chain is too tight it will make the bottom edge of the blanket curve upwards and this can’t be fixed later. If you chain tightly, go up to a 5mm hook, just for the chain.
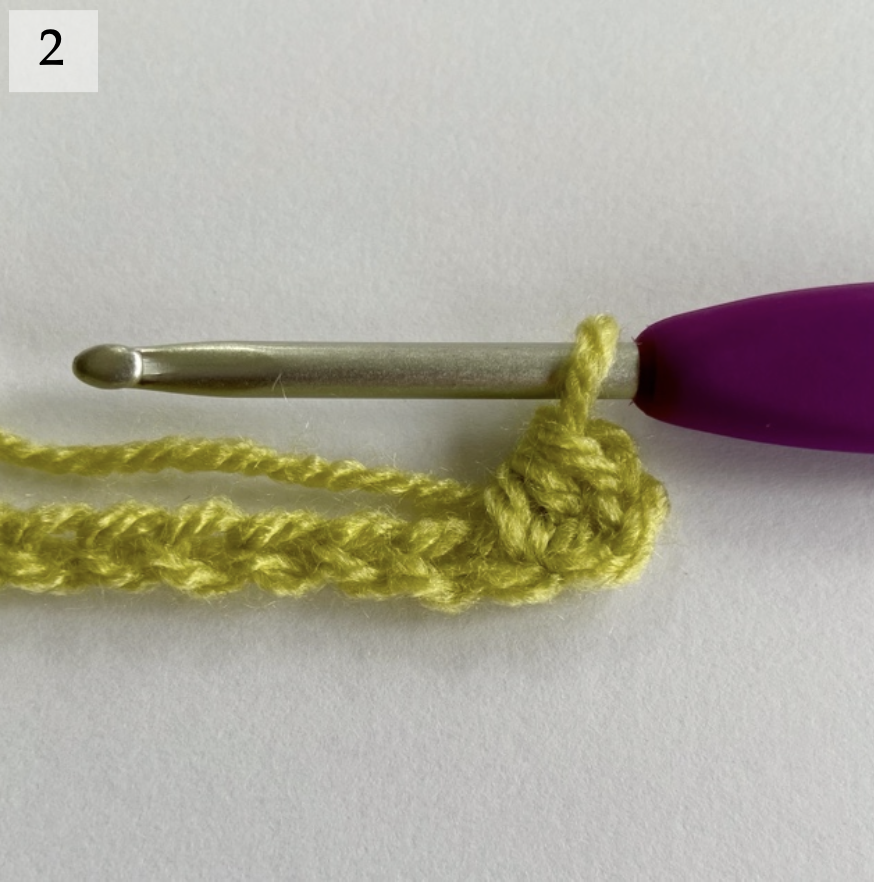
2. Row 1 - 1tr in the third ch from the hook.
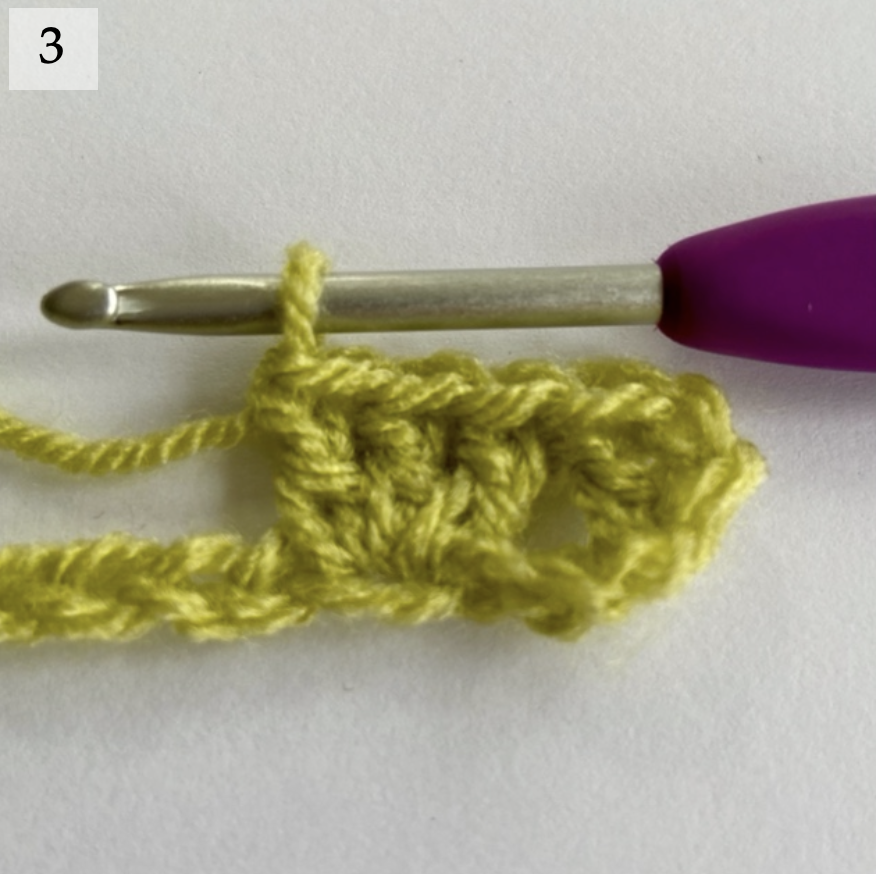
3. Sk 2 ch, 3tr in the next ch. Repeat across until 3 chains remain.
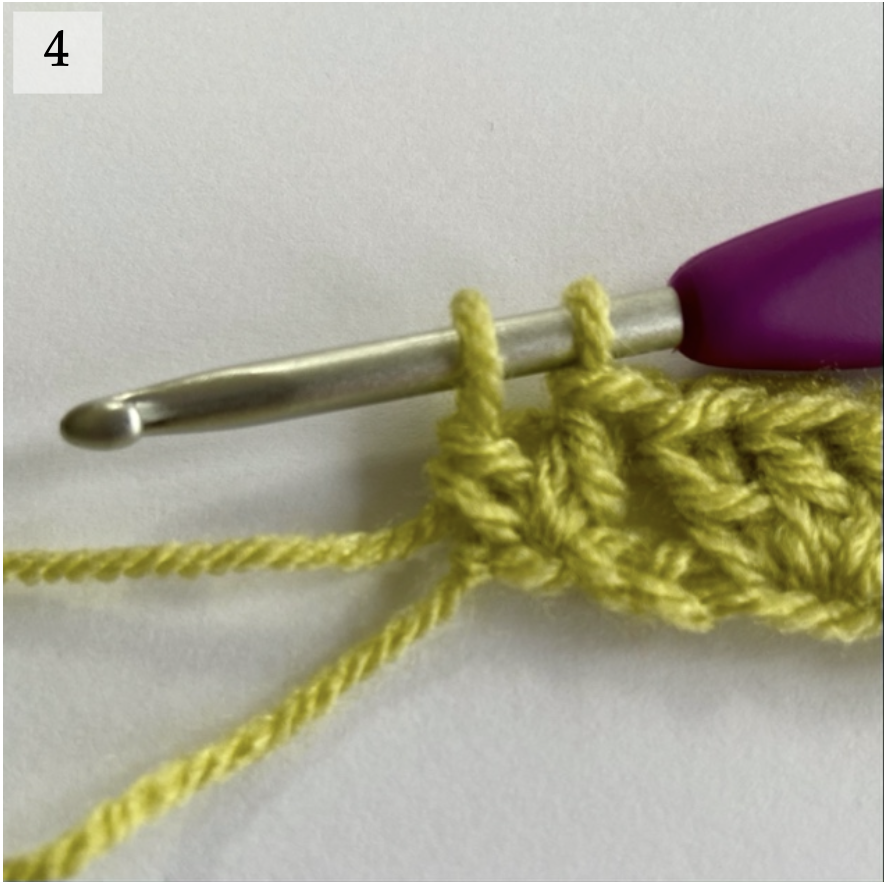
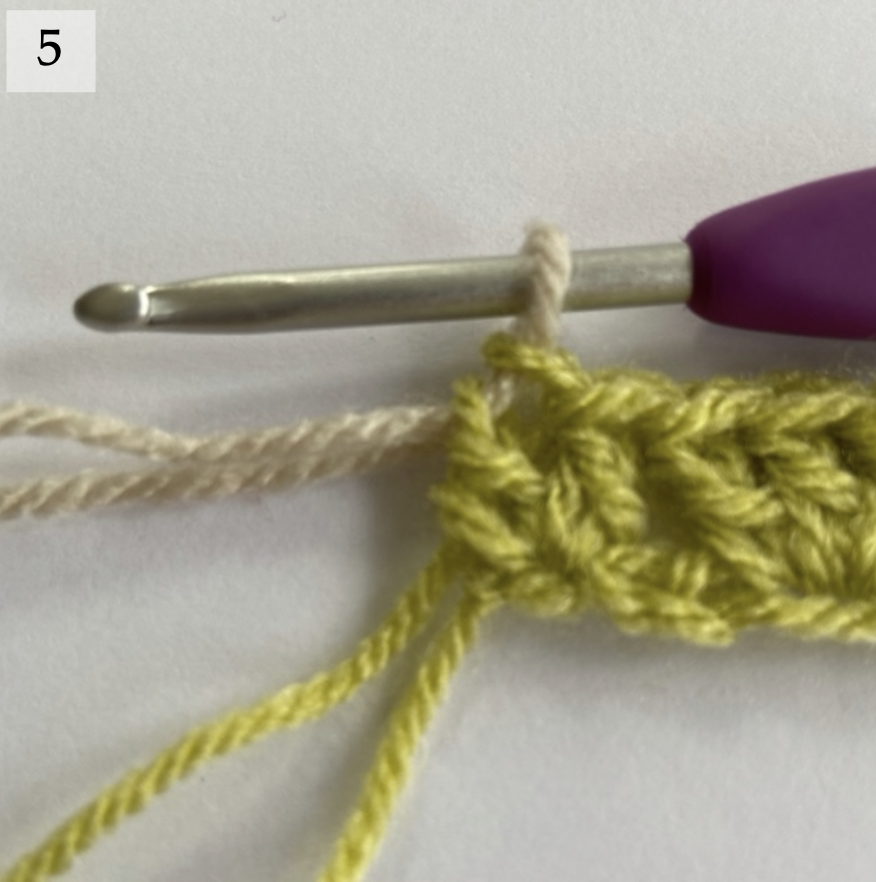
4. 1tr in the last chain. Make a second tr in the last chain but complete the stitch with the new colour.
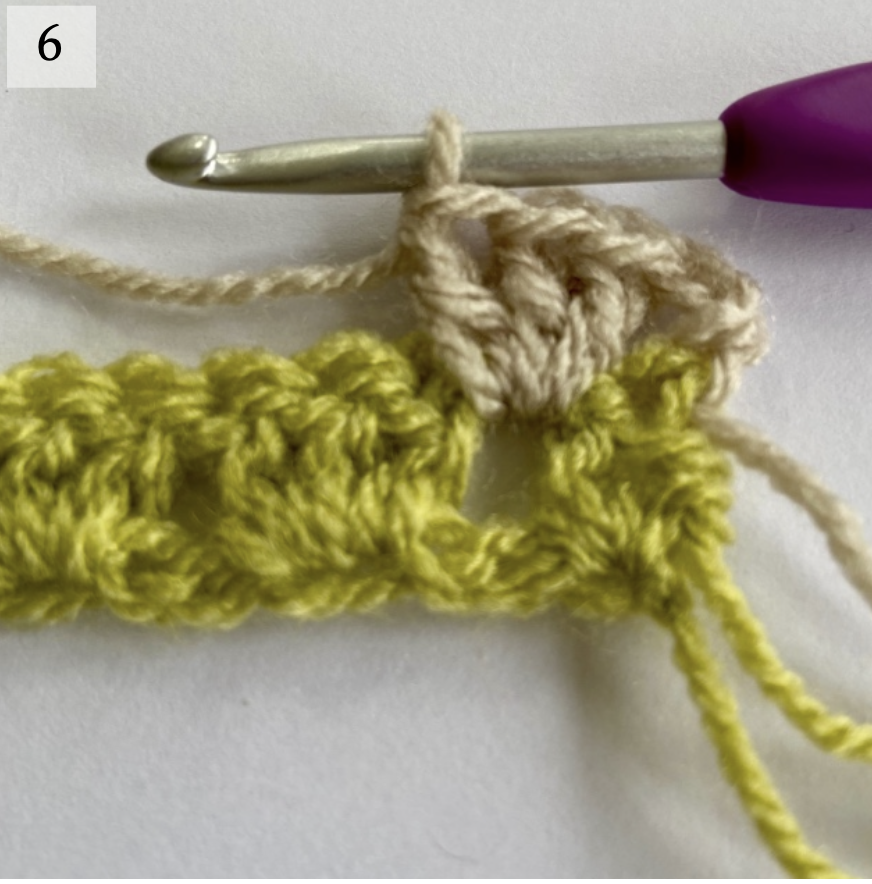
5. Do this by pulling through a loop of the new colour and using it to complete the stitch. You can now snip off the first colour. Leave a tail of about 10cm to sew in later. 2ch, turn.
6. Row 2 - 3tr in the first space between trebles in the row below.
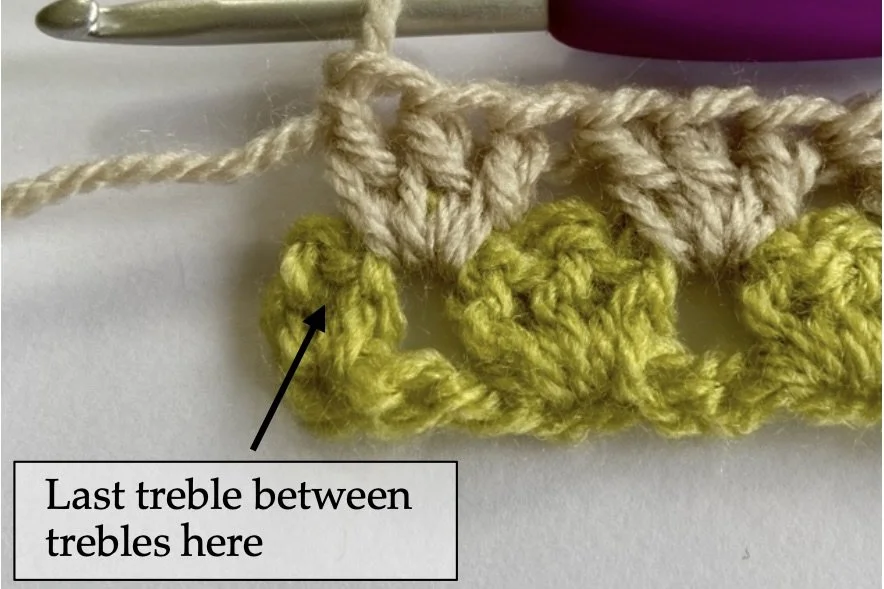
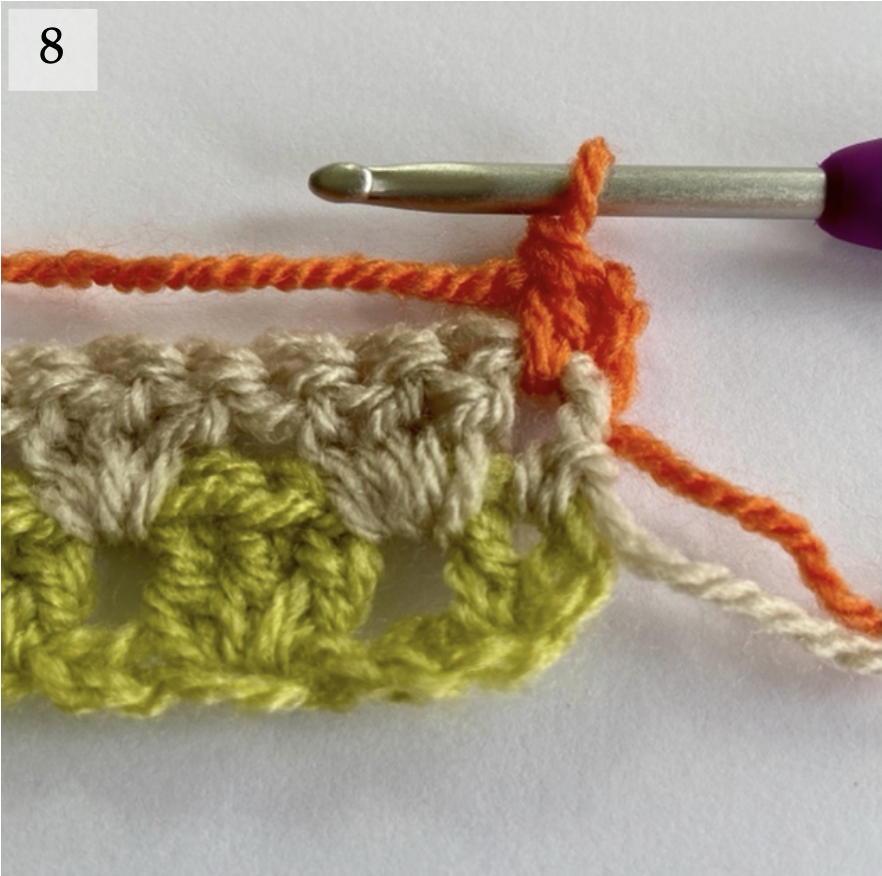
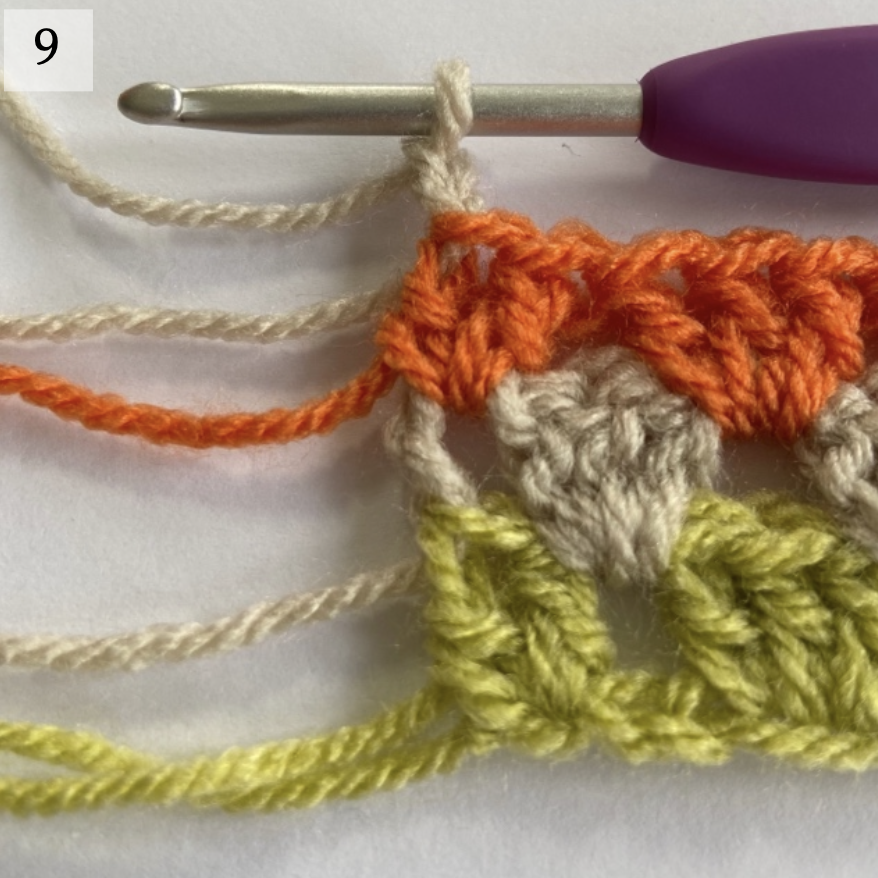
7. Repeat across until you reach the end of the row. 1tr between the two tr in the row below. 8. Finish this stitch by changing to the next colour as above. 2ch, turn.
9. Row 3 - 1tr in the first space, 3tr in each space across until you reach the end of the row.
At the end of the row, 2tr in the last space, changing to the next colour in the last stitch, 2ch.
Repeat rows 2 and 3 until your piece is the required length.
My Favourite Stripes Blanket Pattern
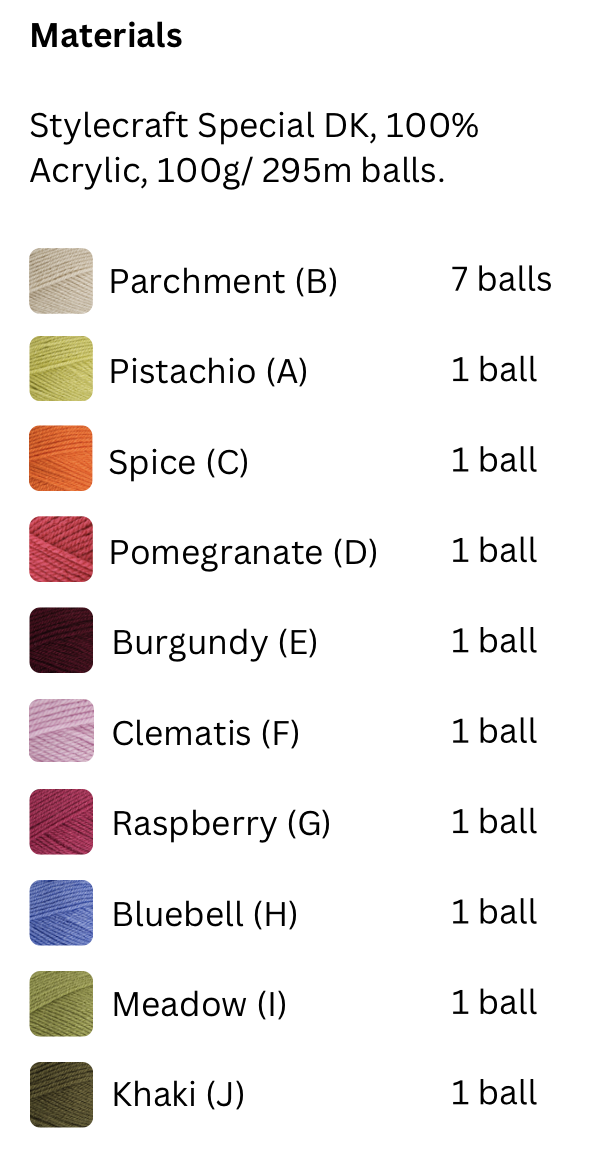
The image below shows the colour order for the stripes in the blanket. Row 1 is colour A, Row 2 and every subsequent even row is colour B. If you want to make your blanket longer or shorter, just adjust the number of pattern repeats to suit.
Using 4mm hook and colour A, ch 171.
Row 1 - 1tr in third ch from hook, (sk 2 ch, 3tr in next ch) until 3 chs remain. 2tr in last ch. Change to colour B in last tr, 2ch, turn.
Row 2 - 3tr in first space between trebles in row below. Repeat across. 1tr between last 2tr in row below. Change to colour C in last st, 2ch, turn.
Row 3 - 1tr in first space. 3tr in next space and repeat across. 2tr in last space. Change to colour B in last st, 2ch, turn.
Rows 4 - 161 - Repeat rows 2 & 3, changing colours according to the colour chart. Work nine repeats of the colour chart. On the last repeat, finish with colour J and omit the final row of colour B.
Sew in all tails.
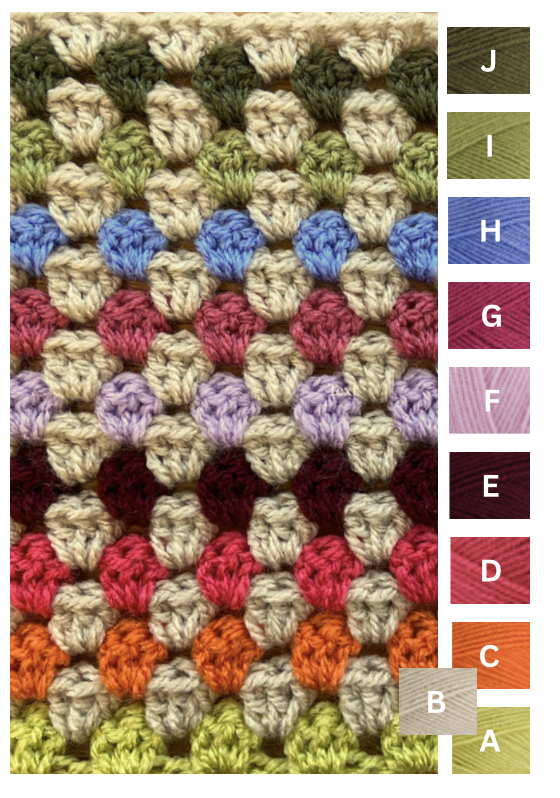
This is the colour order for the stripes in the blanket. Row 1 is colour A, Row 2 and every subsequent even row is colour B. If you want to make your blanket longer or shorter, just adjust the number of pattern repeats to suit.
You now have two options to complete your blanket. A deep ribbed border at the top and bottom of the blanket which has a really cosy knitwear feel. I used this border when I remade the blanket in 2021. Or you can use the simple bobble border that I used on my original 2014 blanket.
Ribbed Border
This deep ribbed border is quick and easy to do and a really effective way to finish off your stripe blanket. Depending on your tension you may need to go up a hook size after the first row of htr. This will help your border to lay flat.
You can use this border on any size blanket, just make sure you start with an odd number of htr.
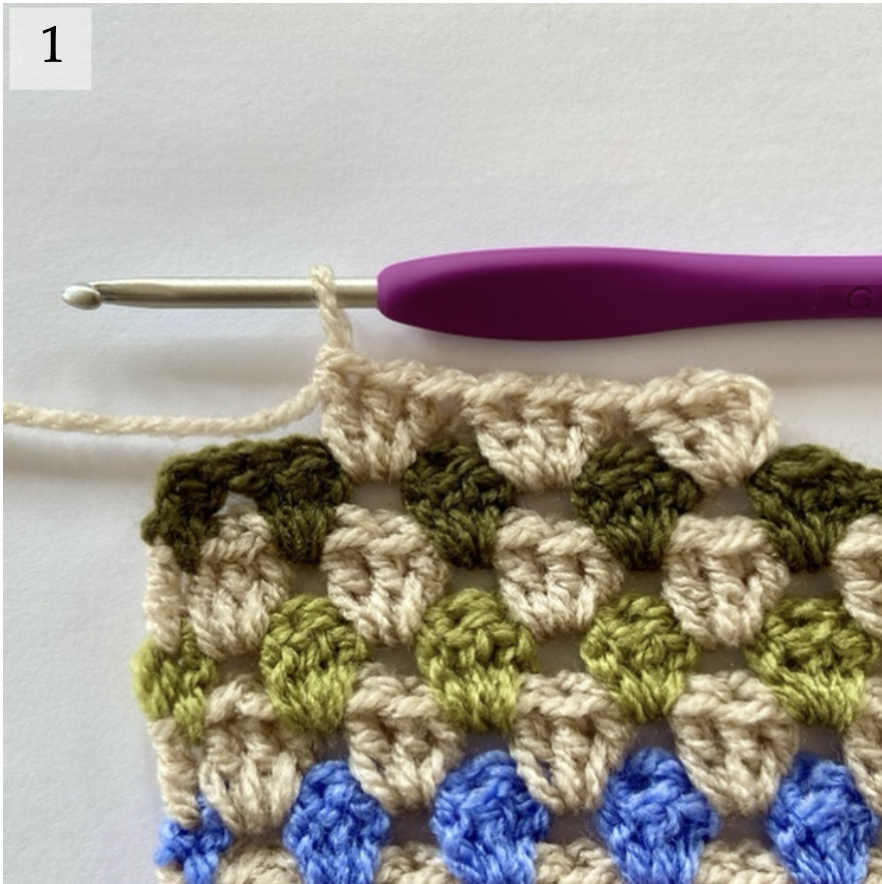
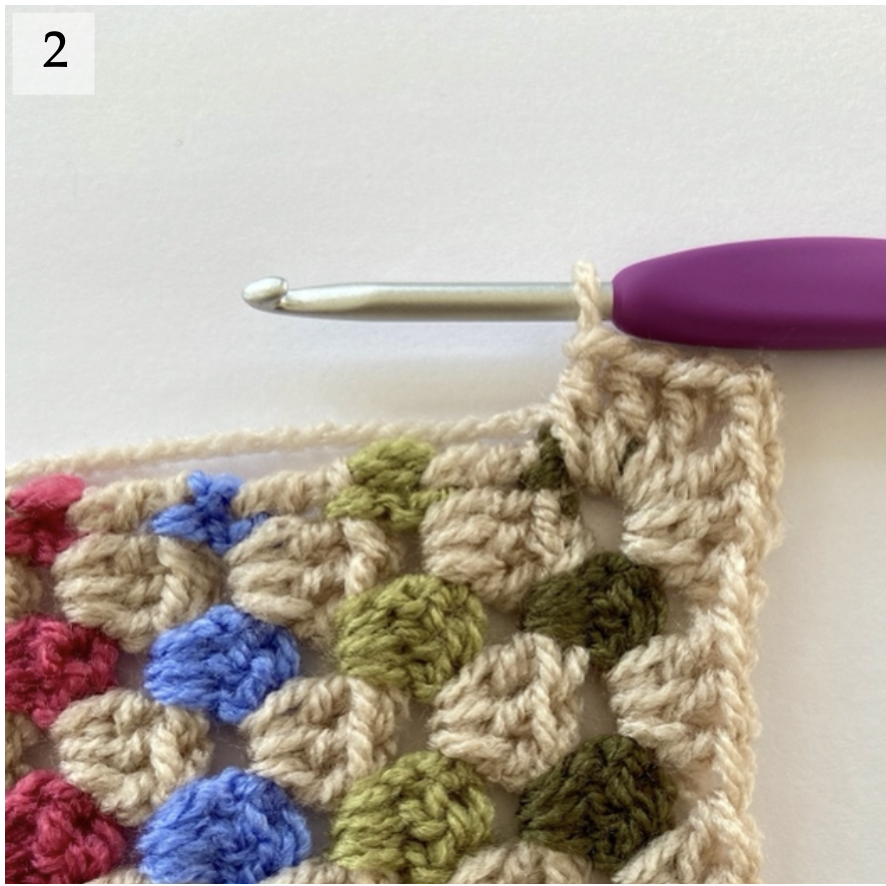
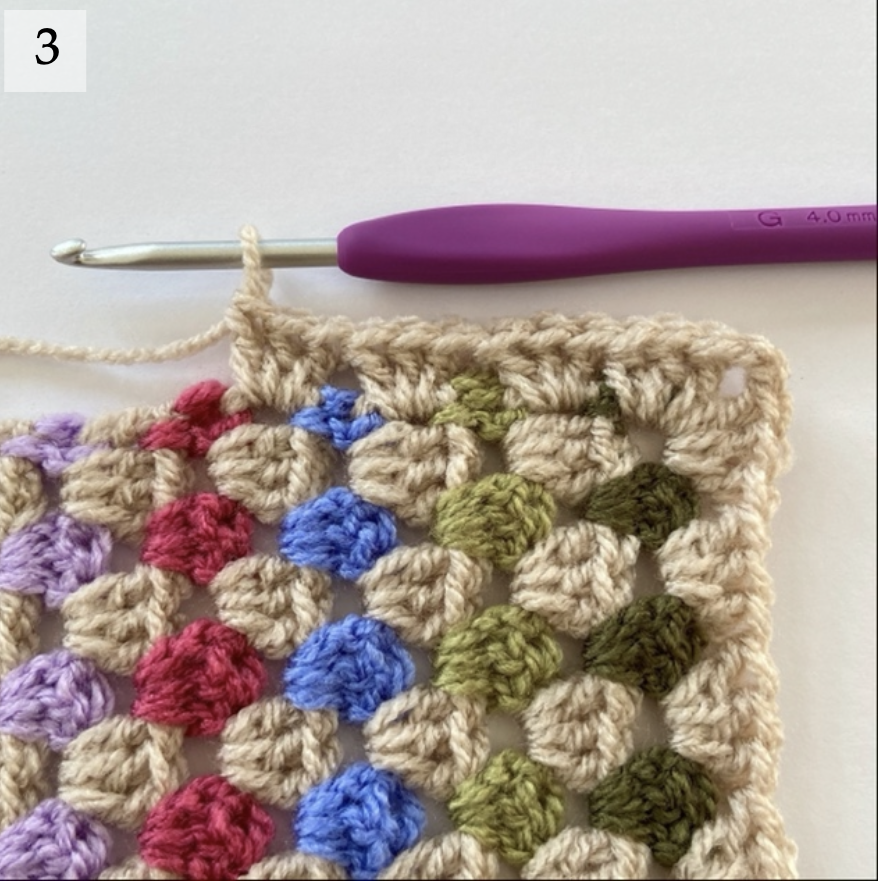
1. Round 1 - Join colour B in any sp between tr, anywhere along the top edge. 2ch,(counts as first tr), 2tr in same sp, 3tr in each sp until you reach the corner.
2. 3tr, 2ch, 3tr in the same corner space.
3. 3tr at the end of every colour B row. At the next corner 3tr, 2ch, 3tr and then 3tr in each sp along the bottom edge. Keep working around in the same manner.
4. Join to your first 2ch with a sl st. Fasten off.
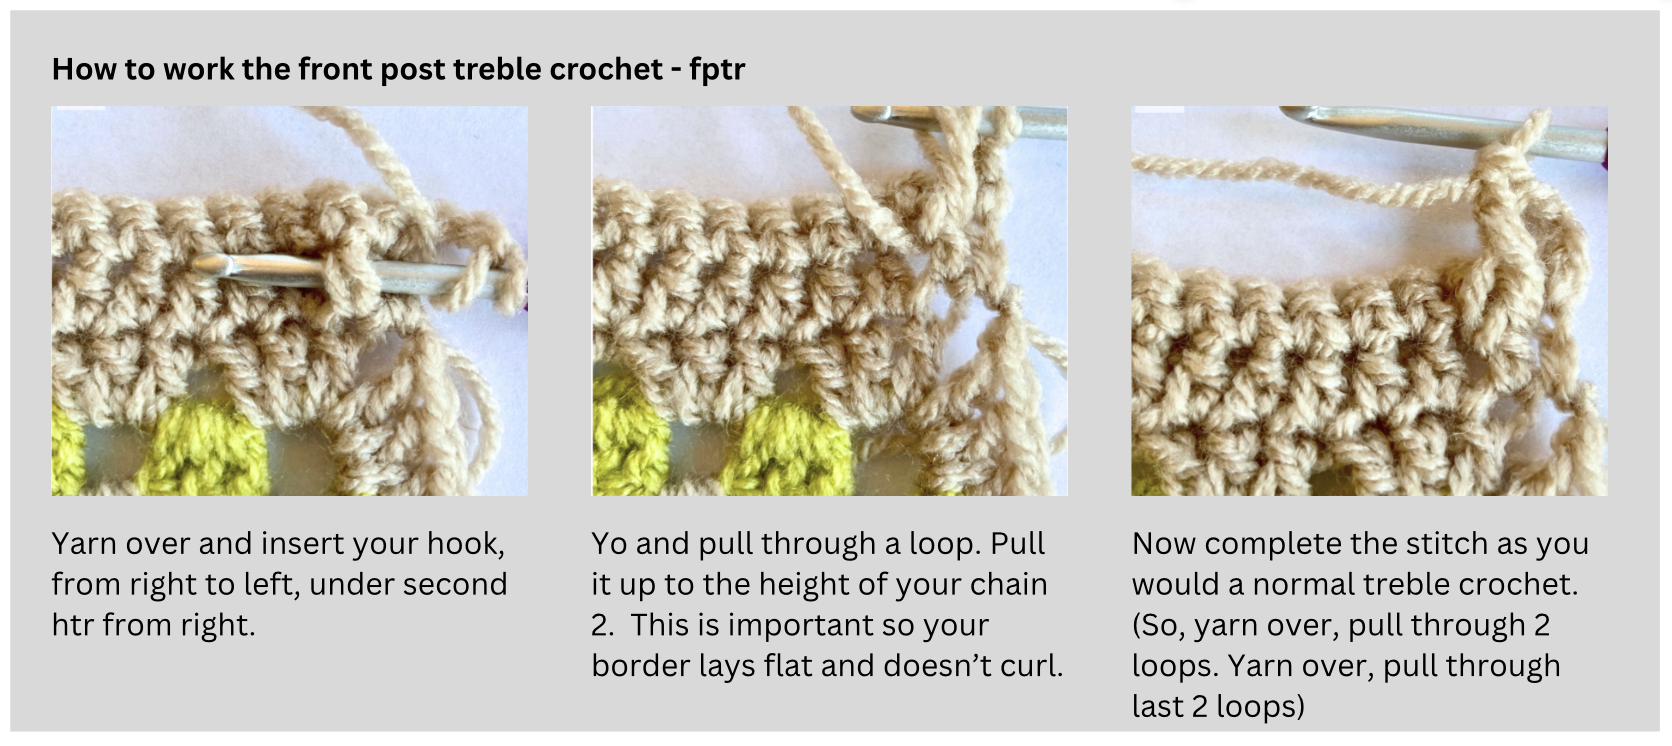
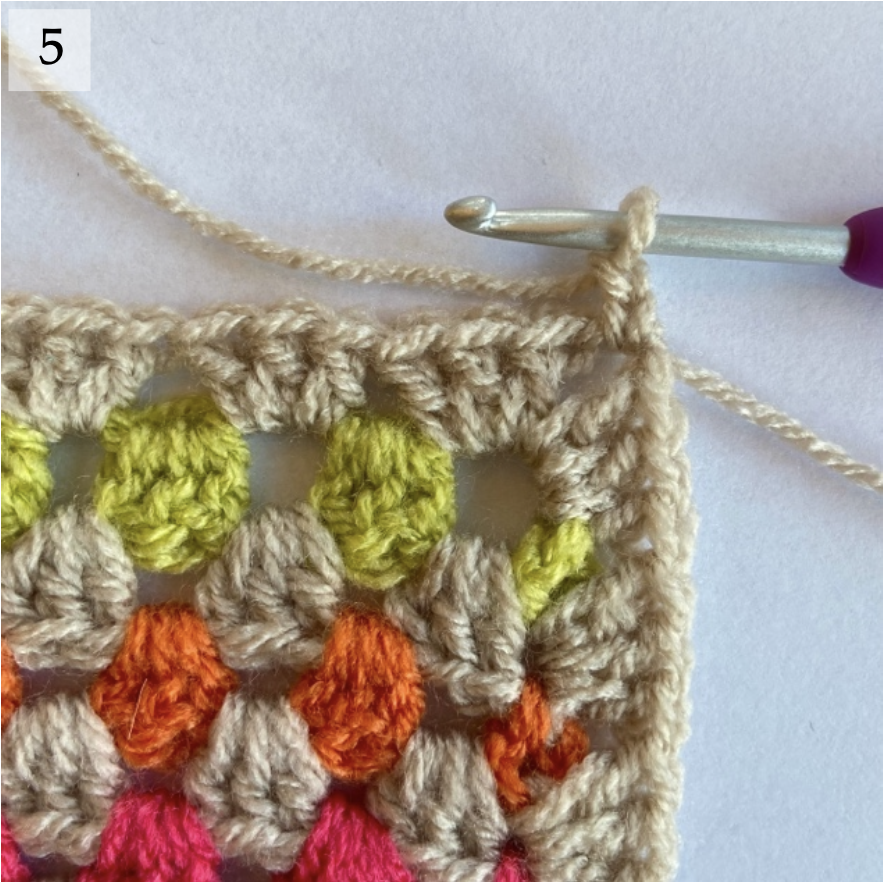
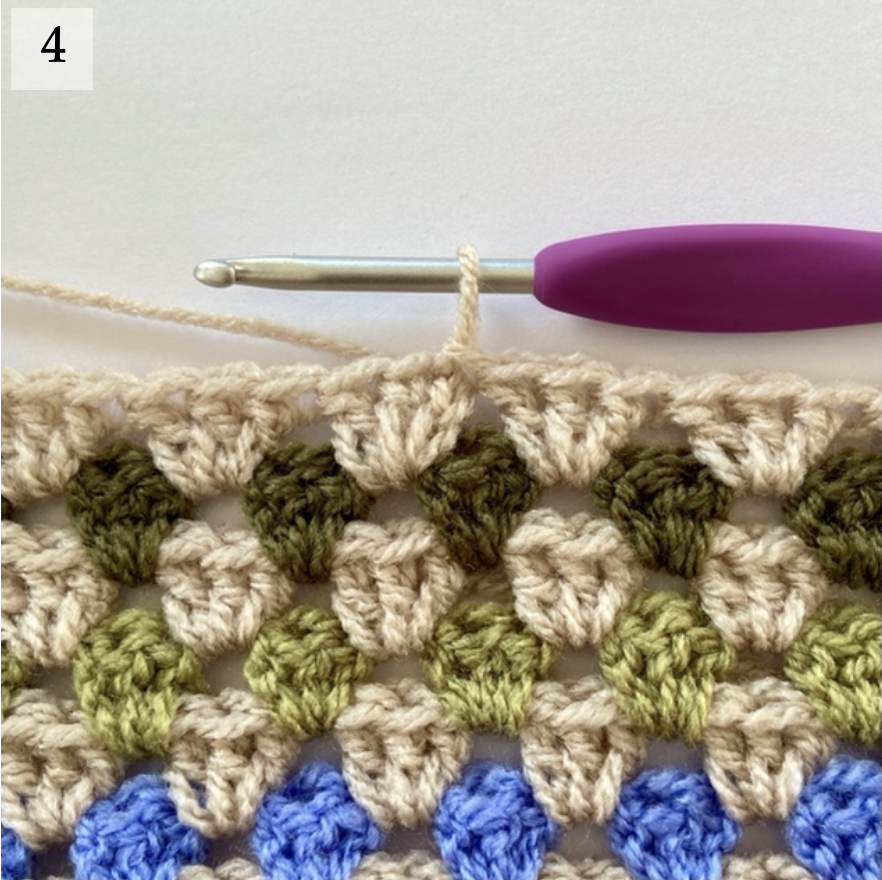
5. Row 1 - Join yarn B in the corner sp at the bottom left corner of the blanket. 2ch (counts as 1st htr). 1htr in next 169 sts, htr in last corner sp. (171 htr including first 2ch) 1ch, turn.
Row 2 - 1dc in each st. (The last dc will be in the top of the starting 2ch.) 2ch, turn. (171 dc)
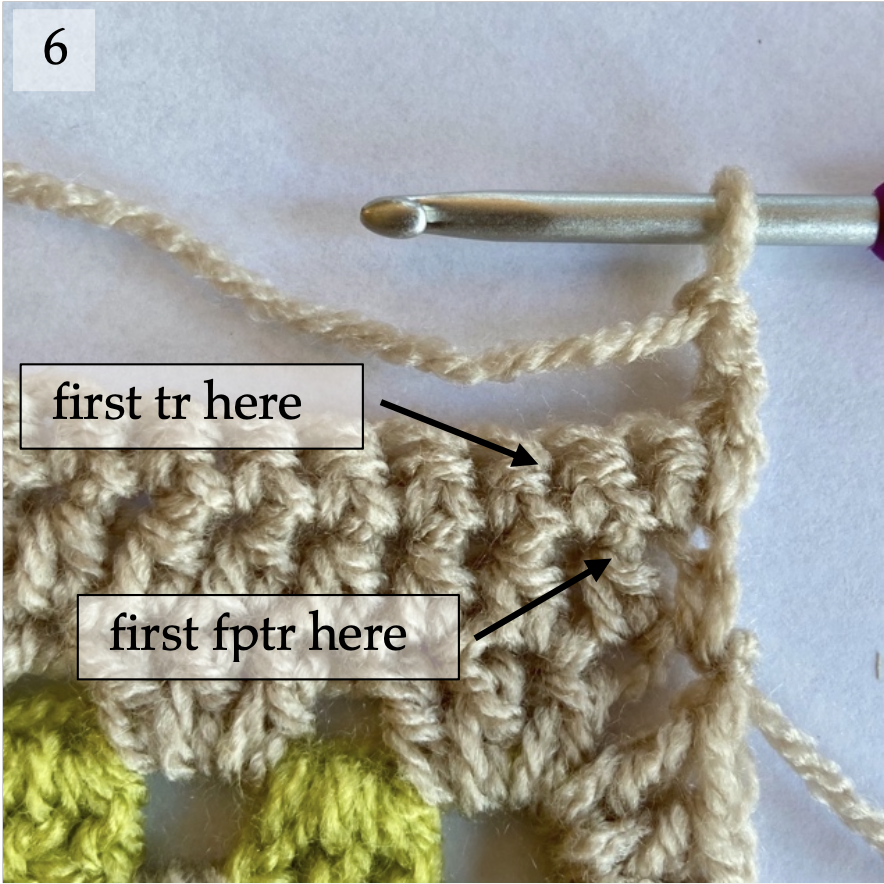
6. Row 3 - (fptr over htr 2 rows below. Sk 1 st and 1tr in the next dc) Repeat across. The arrows indicate where to place the first fptr and tr. 1ch, turn. (171 sts)
Row 4 - Repeat row 2.
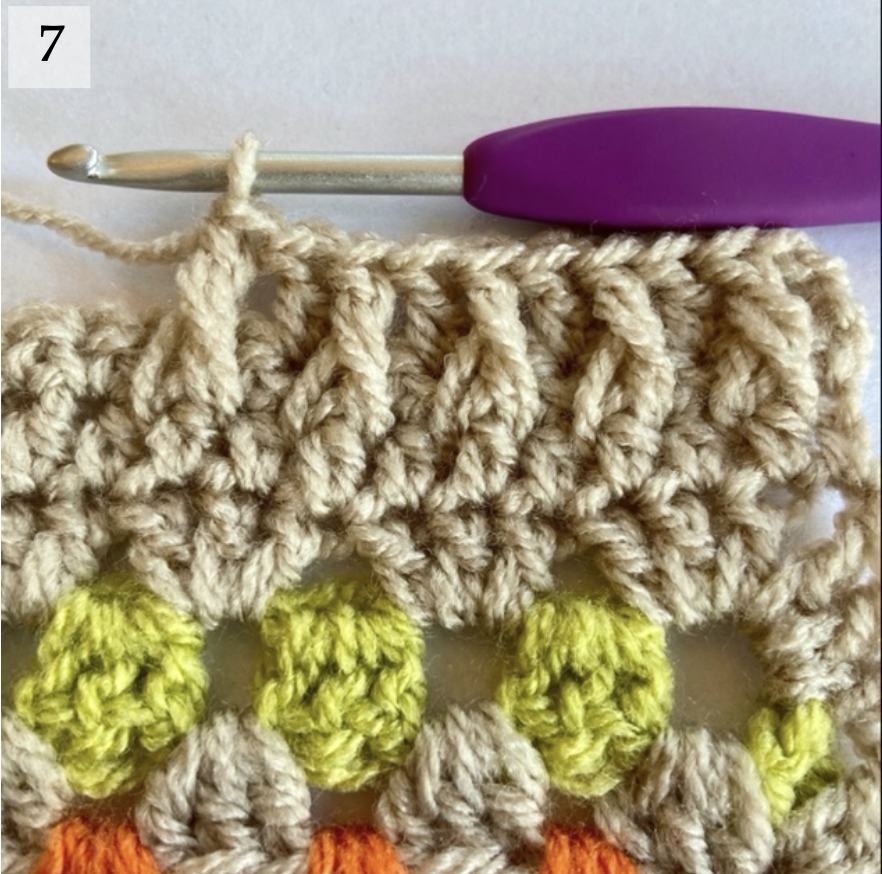
7. Row 5 - (fptr over fptr 2 rows below. Sk 1 st and 1tr in the next dc) Repeat across. 1ch, turn. (171 sts)
Rows 6 - 13 - Repeat rows 4 & 5, 4 times. A tr will always be on top of a dc and a fptr will always be on top of another fptr. Fasten off.
Repeat rows 1 - 13, this time starting at the top right corner of the blanket.
Sew in all tails.
Bobble Border
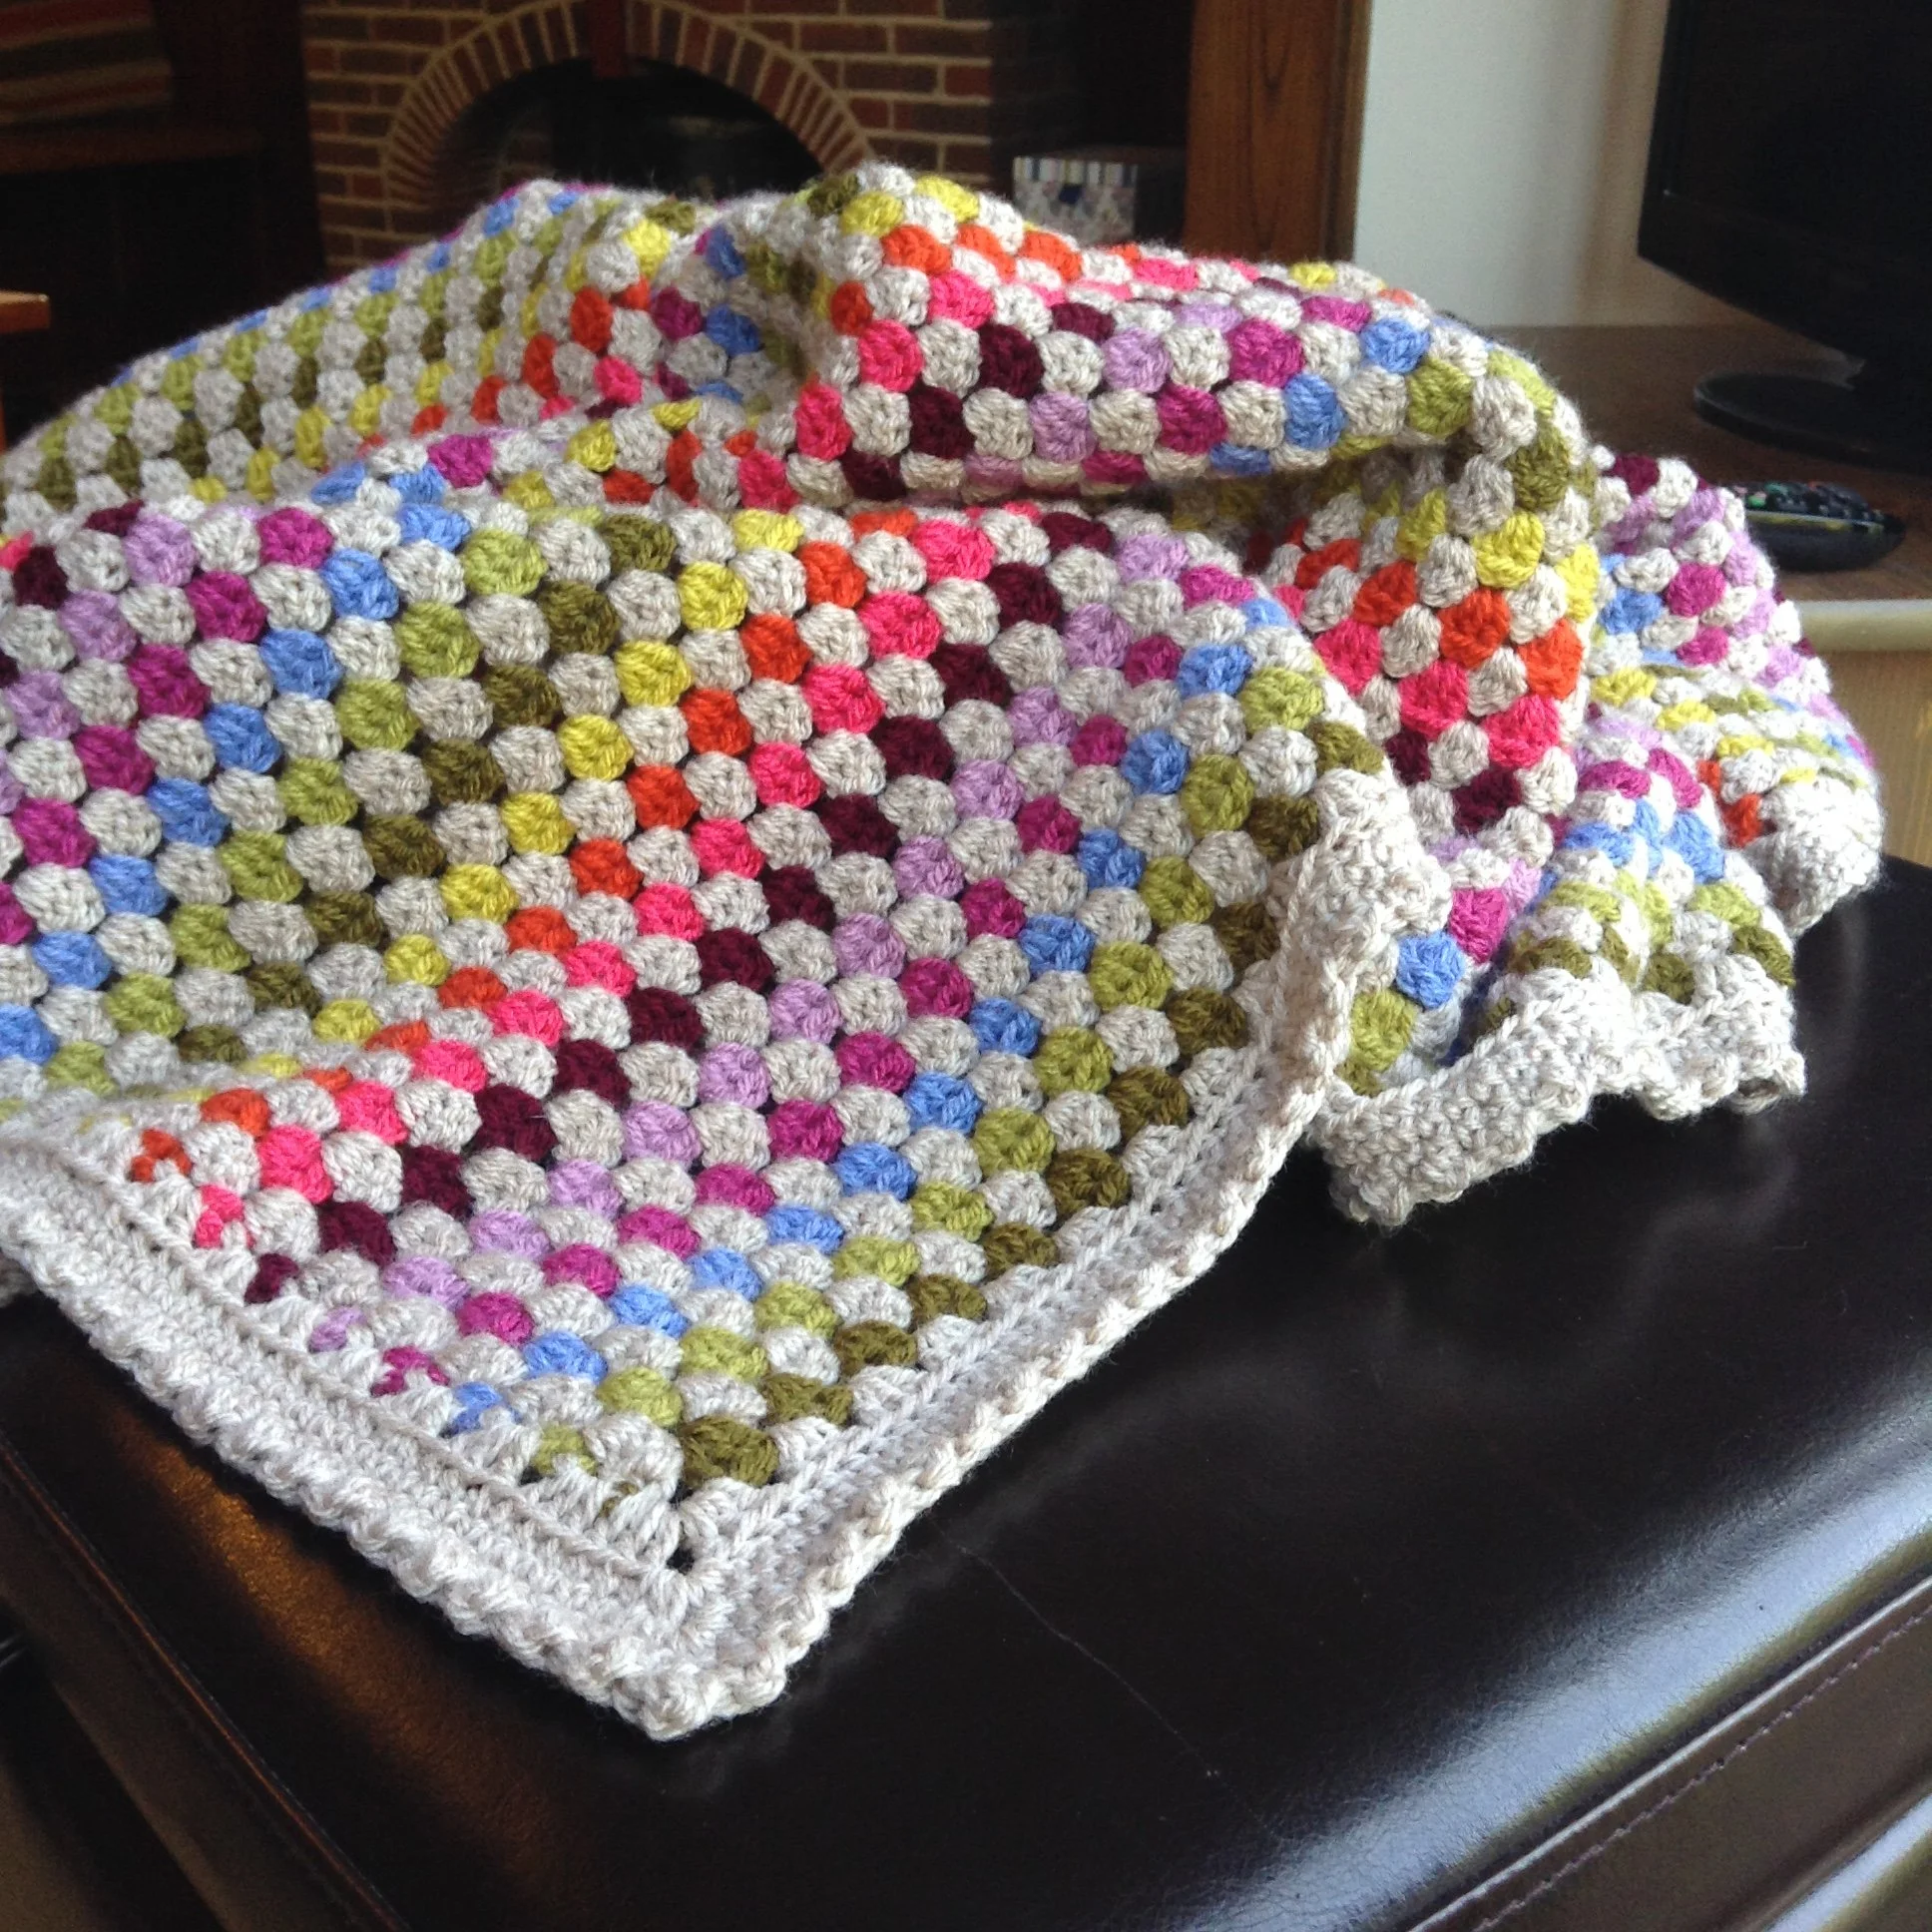
This is the border I used on my original version of the blanket. It’s very simple to do but so effective and can be used on all sorts of blankets. It will work on any size blanket with no need to adjust stitch counts. It’s my ‘go to’ when I’m not sure what to use.
Round 1 - Work as round 1 for the ribbed border, except, when you have completed the round, don’t cut the yarn, instead, 1ch.
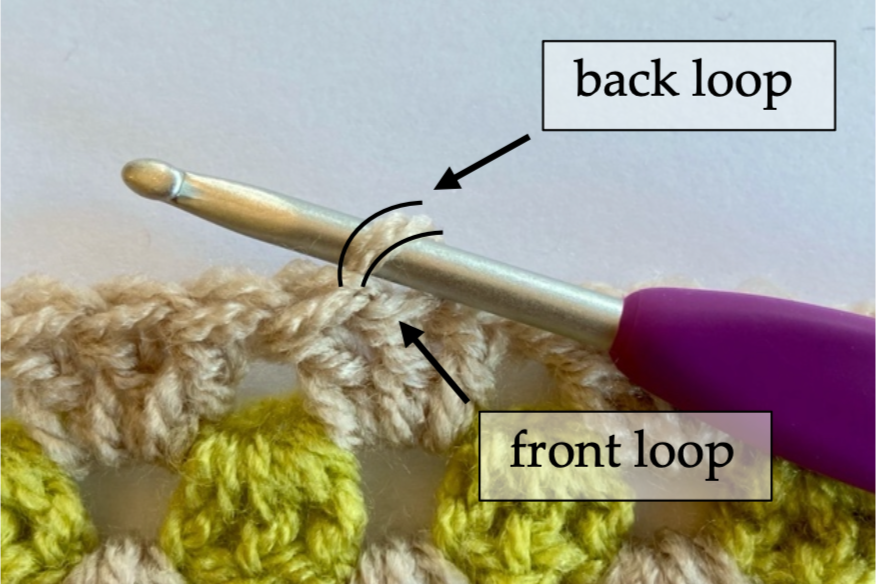
Round 2 - 1dc in each st in the back loops only. When you reach a corner, 1dc, 2ch, 1dc in the same corner sp. Continue around until you reach first dc. Join with a sl st, 1ch.
Round 3 - 1dc in each stitch, this time through both loops. At the corners, 1dc, 2ch, 1dc in the same corner sp. At the end of round, join with a sl st, 1ch.
Round 4 - Repeat round 3, except, at the end of the round, 2ch, turn.
Round 5 - The chain 2 counts as first tr. Sl st in the next st then 1tr in the following stitch. Alternate between sl st and 1tr around. When you reach a corner, make one of each stitch in the corner sp. It doesn’t matter which order these stiches occur in, just continue in your alternating pattern. At the end of the round, join to the first 2ch with a sl st. Fasten off and sew in tails.
I hope you enjoy making this blanket and it brings you some calm in a crazy world.
Anita x
You can buy a kit to make this blanket here.
There’s also an advert free pdf with the complete pattern and tutorial.